
Setting the stage
For the last two years I've worked on a Node.js project. We used GitHub for source management and Jenkins for continuous integration. We also had a deployment tool based on Docker and Terraform.
We have done a few improvements to the configuration during this time. One of the changes that had a positive impact was to run the CI pipeline on branches and to see the feedback in GitHub.
Checking the outcome of the build before merging a PR prevented a lot of breakages due to tiny mistakes. Like forgetting to run the linter or to add a new file. Once we decided to automate the update of dependencies the feedback made it quick and safe. Read Taming dependabot by Christopher Eyre) for that part of the story.
In this post I'm going to explain how to configure a Continuos Integration and Deployment Pipeline using:
- Jenkins for the build configuration. The Multibranch Pipeline for creating the builds. A Jenkinsfile for deciding what to execute in each build
- GitHub to store the sources, check the build output, and to merge branches to master
- Docker to isolate the build from the execution environment. Be it a developer machine or a Jenkins node
Features
The configuration of the build pipeline is versioned together with the source code. This gives you:
- History of old configs and ability to rollback
- Atomic changes of config and source
- Use of branches to experiment with the configuration itself
Building and feedback from branches means you can:
- Look at the outcome of the build during code review
- Prevent branches from being merged if they break the build
- Automate merge of non breaking changes
Other minor things:
- The build is defined as a sequence of steps rather than jobs so it does not re-enter the queue once it starts
- You can do most of the build configuration by editing a file instead of using the Jenkins web UI
Drawbacks
- You'll need to learn the syntax of the Jenkinsfile
- There are two different syntax options (scripted and declarative) which you need to be aware of
- The documentation on how to use the plugins is not always clear and often does not have any examples
The app
I’ve created a Node.js web application to serve as an example. To keep the build simple the app has no external runtime dependencies, such as databases or services. It is possible to extend this configuration to cope with external dependencies without compromising isolation; for example by provisioning dependencies with Docker Compose.
The Dockerfile
FROM node:lts-slim
WORKDIR /opt/app
COPY package.json yarn.lock ./
RUN yarn
COPY . .
EXPOSE 8080
CMD yarn start
Docker is the most popular application containerisation solution available. For a full introduction to Docker I'd recommend Containers with Docker by Andre Torres.
In this CI pipeline Docker isolates the application code from the Jenkins node.
Isolation enables replication. If the build fails in Jenkins and we need to investigate the failure we can be replicated on a developer machine since the state of the Jenkins node and its software have no effect within the container.
Isolation also solves the issue of having different runtime environments. Different applications can each specify a different version of Node.js in the Dockerfile to use for testing and when deployed.
The Jenkinsfile
pipeline {
    agent any

    stages {
        stage('Build') {
            steps {
                sh 'docker build -t codurance/jenkins-pipeline-blog:latest .'
            }
        }

        stage('Test') {
            steps {
                sh 'docker run codurance/jenkins-pipeline-blog:latest yarn test'
            }
        }

        stage('Deploy') {
            when {
                branch 'master'
            }
            steps {
                sh 'docker push codurance/jenkins-pipeline-blog:latest'
            }
        }
    }

    post {
        failure {
            echo 'build is broken. notify team!'
        }
    }
}
This groovy file replaces the long web forms normally used to configure jobs in Jenkins. The pipeline in this example has three stages (Build, Test, Deploy) each implemented by steps.
The Deploy stage runs only when the master, or Trunk, branch is affected. In this example it is publishing the image to hub.docker.com but you will likely replace it with the infrastructure commands you are using to deploy your application.
The pipeline also has a section called post with steps such as always and failure which are triggered after the build completes. These extension points can integrate messaging systems, like Slack, in your workflow.
The Jenkins setup
Jenkins needs access to GitHub. What worked in my case was to create a username & password credential in Jenkins, using a new GitHub personal token as the password. This depends on how your user is setup in GitHub so it may not work for your account. I found a detailed explanation on the CloudBees knowledge base
Having configured the credentials it is time to create a new job in Jenkins. When asked for the type select "Multibranch Pipeline"

The defaults offered by Jenkins are sensible for my workflow so I made very few modifications to it. If you are used to freestyle Jenkins job you will probably be surprised by the small amount of options available. That is because we have already defined the entire build pipeline in the Jenkinsfile.
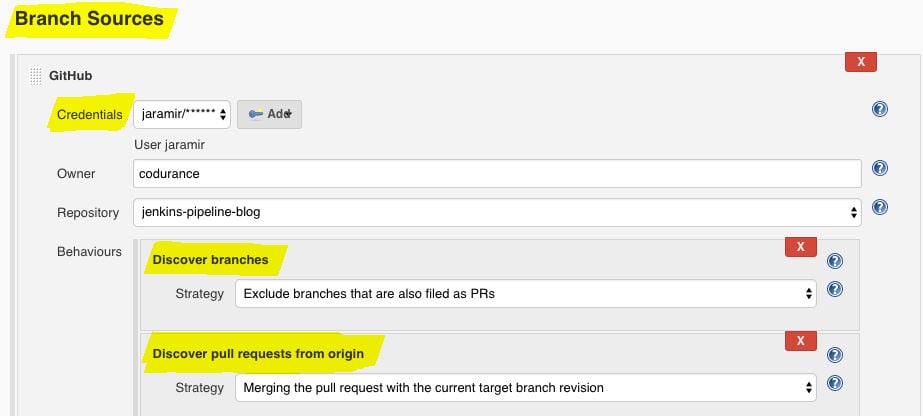
You can configure which commits, branches, or PRs trigger the pipeline. With the setup shown above the pipeline will be triggered when pushing to master, pushing to branches, and when creating PRs.
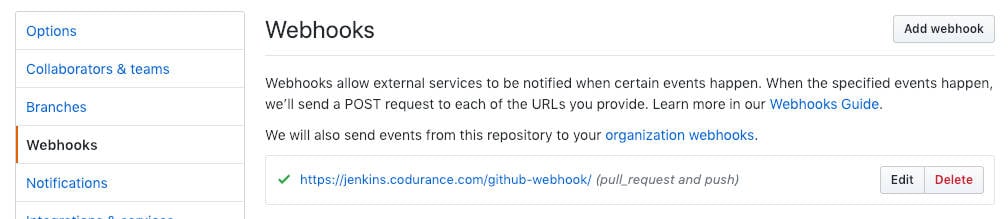
Once you save the config it is a good idea to check the webhook in GitHub. Jenkins will configure a webhook in the repository to trigger the pipeline as soon as a commit is pushed or a PR is created. It requires Jenkins to be reachable from Internet, preferably with a valid SSL certificate.
When clicking on a freestyle Jenkins job a familiar sight is the list of decreasing build numbers. This is now one more click away because each branch and PR gets its own sequence of build numbers.
The build state for branches in GitHub is reported via crosses and tick marks that link back to Jenkins.

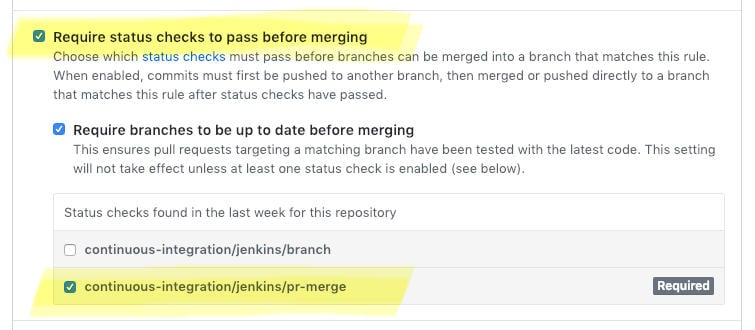
In the case of PRs the pipeline is ran after a merge with master and it is visible together with the PR conversation.

GitHub can also be configured as a gatekeeper so that PRs with failing tests cannot be merged. This feature is called Protected branches.
With the pipeline configured according to your workflow you are ready to start the development of the application.
Where to go from here?
State of the art does not mean perfect. It is the best thing I know of right now, I want to learn more and look back at this as a good step toward something better.
Jenkins is the tool I’ve used the most in this space. It is very possible that with different tools we could get better results. My narrow experience is the limiting factor.
An area not covered in this post is how to work with application that have external dependencies. I will cover that in a future post.
Let me know what you think by tweeting me at @jaramir or @codurance.
Happy Hacking!
Resources
- Example Node.js project https://github.com/codurance/jenkins-pipeline-blog
- Jenkinsfile syntax https://jenkins.io/doc/book/pipeline/syntax/
- Jenkinsfile steps reference https://jenkins.io/doc/pipeline/steps/
- Multibranch pipeline https://jenkins.io/doc/book/pipeline/multibranch/