In the previous post, we introduced the Bank kata. We explained how we are going to implement it in Android, reviewed the different kinds of tests that we use in Outside-in and transformed a user story into a bunch of acceptance criteria.
In this second post, we will focus more on the practical side. We will show how to build the acceptance test from the acceptance criteria, how acceptance tests and unit tests fit in the double loop of TDD and how we rely on them to guide us through the implementation.
We will be explaining everything following the flow of Outside-In TDD in a step by step fashion.
Outer loop - Acceptance test
As we discussed early on, we have to show the statement lines that compose an account statement. Concepts such as Statement, Statement line and Transactions are part of our domain. We will follow them throughout the post and code.
To show the statement lines we decided to use a Recyclerview. Following the acceptance criteria each statement line has to be formatted as follows:
'Date' - 'Amount' - 'Running balance'
It is worth mentioning that many people leave the UI out of the scope of the acceptance tests. In our case, we consider that in most mobile applications the UI is critical and therefore should generally be included. Whether you do it or not is your decision, however, we will show how it can be done. To assert the state of the view we are going to use Espresso, the official Android UI testing framework. Espresso does not offer a way to assert the state of each row in a RecyclerView out of the box, so we need to use the following snippet to be able to do so, RecyclerViewInteraction. We consider that this piece of code is part of our testing framework. That is why it is already included as part of the initial steps.
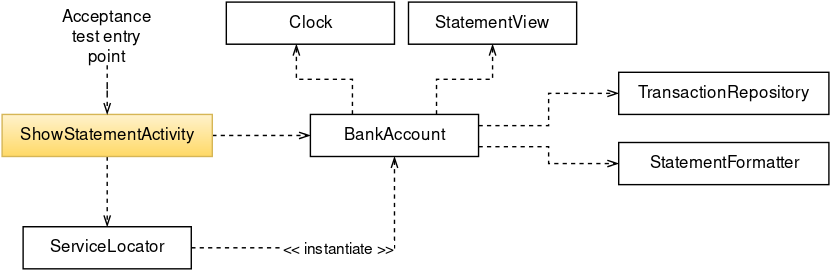
As we stated in the previous post, Android is responsible for instantiating Activities. We can’t instantiate them manually. Bearing in mind that dependency injection through the constructor is not an option here, we had to come up with an alternative mechanism to instantiate custom dependencies for tests. For simplicity’s sake, we are not going to use any dependency injection framework. Instead, we are going to use the Service locator pattern. Using this pattern and a static method setInstance we will be able to provide custom dependencies to the activity without using constructor dependency injection.
Before asserting that the UI is showing the expected information, we need to define the layout that it is going to use to show it. In Android every view has an ID. We will need those IDs to reference the views in the acceptance test to assert that it is showing the correct information.
Having said that, let’s focus on the important stuff.
Following the acceptance criteria, defined in the previous post, we have to make two deposits and one withdrawal. Notice that withdrawals are transactions with negative amounts.
As in Outside-In design happen in the red phase, we have to design the skeleton of the classes that we know are needed at this point. We do not need to know and define the whole tree of collaborators, only the ones that we know that are needed. In contrast with classicist TDD, where everything emerges from the tests, in outside-in we need to do some design up front. You might want to check out this blog post for a more in detail discussion.
At this point we know we need the following collaborators:
- TransactionRepository - We know that we need some storage to save transactions. We decided to follow the Repository pattern to hold an in-memory implementation.
- ViewStatementLine - We are going to use a RecyclerView that comes with an adapter. The adapter needs to hold a collection of a type that contains the information required for each row. ViewStatementLine is that type. It does not have any business logic and it is mapped 1:1 to the information shown in the UI.
- StatementFormatter - This collaborator will convert the domain objects to the format needed in the UI. Date, amounts and text formating is the kind of logic that has to be included here.
- ServiceLocator - As mentioned before, this collaborator provides custom BankAccount instances to the activity.
- Clock - Time… time has a random factor and is outside of our control. To gain control over it, we have to encapsulate time randomness to have control over it during testing.
We will see the collaborators in more detail later on, while we implement them.
Once we have finished writing the acceptance test and we see it failing for the right reason (The view is not showing the statement), we will dive into the inner loop and start writing the individual pieces required for the feature.
Inner loop - Unit test
The first collaborator to implement is the one in the outer layer of the system, in this case, the ShowStatementActivity.
- ●c22ab01 - Let's start writing a failing test that will lead us to create the UI to show the statement. Here we are going to use a vertical RecyclerView.
- ● 8d6122f - Once we have the failing test, we have to make it pass by loading the activity layout, holding a reference to the RecyclerView and setting a LinearLayoutManager with a vertical orientation.
- ●08a593 - We started by including all the code inside the onCreate method. In the refactor phase, we decided to extract a initView method to wrap view initialisation code.
At this point, the RecyclerView is initialised and ready to hold the statement rows, but we still need to show the account statement. Let's do it.
- ●8520fb - The test has to verify that when the activity is launched, the view gets attached to the account and the BankAccount showStatement method is called. As mentioned before, we do not have control over the activity instantiation so we need to use the ServiceLocator to provide a test BankAccount for the activity.
- ●fcb403 - To make the test pass we need to obtain the account reference from the ServiceLocator, attach the ShowStatementView (activity) to the account instance, and call its showStatement method.
- ●bd961c - We added all the code inside the onCreate method. Following the same reasoning as in the previous refactor, we extract a initAccount method that wraps bank account initialisation code.
The activity is now complete. The next step would be to implement the next collaborator, the ServiceLocator. The ServiceLocator job is to provide BankAccount instances to its clients. Let's implement it doing a second iteration of the inner loop cycle.
- ●7fb17b - The test for the ServiceLocator has to assert that the provided BankAccount is not null.
- ●8ce146 - In this case is just as simple as returning a new BankAccunt instance.
- ●There is no refactor to do in this step, so let's move to the next iteration.
Now that the outer layer is done, it is time to move to the next level of abstraction and implement the BankAccount. Among the BankAccount public methods we need to decide which to implement first - deposit(), withdraw() and showStatement(). We recommend following the order in which the methods are used in the acceptance test. We will show how we can ensure the order later on. In this case, the method that is used first is deposit(). Let's implement it by going through another iteration of the inner loop cycle.
- ●a1f870 - The behaviour of this method is to create a transaction, using the amount parameter and the current time, storing it in some kind of persistence.
Remember that the acceptance criteria explicitly states that the statement should be sorted in reverse chronological order and that each line has to contain the transaction date. To be able to test that the transaction was created with the current date we need to stub the Clock the same way that was done for the acceptance test. Later on, we need to verify that the repository stores the correct transaction.
One last point to make is that the TransactionRepository store method is now throwing an UnsupportedOperationException. As we are mocking it in the current test, we do not care what is inside the production code of the TransactionRepository. We will explain later on how throwing exceptions is going to guide us showing what we need to implement next.
- ●1f5cda - As we have already made the decision about the design, making the test pass is pretty simple. We just need to store a new Transaction with the amount parameter and the current time using the TransactionRepository. We also needed to implement equals() and hashcode() in the Transaction, so that its equality is solved using its fields and not comparing references (Default behaviour in Java).
- ●There is nothing to refactor here. Let's move on and implement the next BankAccount operation.
Now it's time to create the BankAccount withdraw operation.
- ●13c1b41 - Having a look at the test we can observe that it is precisely the same as the one for the deposit operation, but storing a transaction with a negative amount.
- ●83a326 - As defined in the test, the implementation is simply storing a transaction with a negative amount.
- ●27da82 - After implementing both deposit and withdraw methods we wondered if the knowledge of those terms belongs to the BankAccount. In our opinion, the bank account should know about the concepts of deposit and withdrawal, but not what defines them internally (a positive or negative amount). Therefore, we decided to push the logic related to the amount to the Deposit and Withdrawal abstractions respectively. Deposit and Withdrawal are subclasses of the now abstract Transaction class. The repository will continue handling transactions. The BankAccount instantiates Deposit or Withdrawal respectively for the deposit and withdraw operations.
It is important to note that in this case, inheritance is used to specialise the transaction behaviour related to the amount and not for code reuse. Inheritance is a mechanism aimed for specialisation, not for code reuse. The code is now much more expressive, and the responsibilities are where we think they belong.
Conclusion
We have reviewed how to write an acceptance test based on the acceptance criteria. As design occurs upfront, we have decided to create the collaborators that we know that were needed at that time. Lastly, we started to explore our system with the subsequent inner loops.
In the next post of the series, we will finish implementing the system. We will conclude summarising some of the most valuable insights that we have learnt during the process.
This post was cross-posted to my personal blog.